Mini Project - Classify Handwritten-Digit Recognition using Tensorflow(Deep Learning)
HANDWRITTEN-DIGIT RECOGNITION USING TENSORFLOW
In this article, we are going to classify MNIST handwritten-digits using Tensorflow which is developed by Google.
Description of MNIST Handwritten-Digit
The MNIST dataset is an acronym that stands for the Modified
National Institute of Standards and Technology dataset. It is a dataset of 60,000 small square 28*28 pixel grayscale images of handwritten single digits between 0 and 9.
Import the Tensorflow Library
Tensorflow is a Python-friendly open source library for numerical computation that makes machine learning and developing neural networks faster and easier.
create a variable named mnist, and is set to an object of the MNIST dataset from the keras library and we're gonna unpack it to a training dataset(x_train, y_train), and testing dataset (x_test, y_test)
How can I stop training when I reach a point that i want to be at? Well, the good news is that the training loop does support callbacks.So, in every epoch, you can callback to a code function, having check the metrics. and you can cancel anytime.
Building the Model
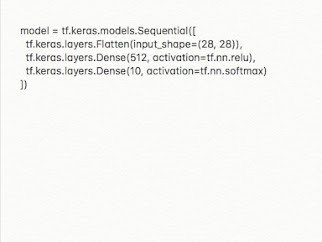
Now we are going to build the model.
It's worth saying that the layers are the most important thing in building an artificial neural network since it will extract the features of the data.
First and foremost, we start by creating a model object that lets you add the different layer.
Secondly, we are going to flatten the data which is the image pixels in this case are 28*28 dimensional we need to make it 1*784 dimensional so the input layer of the neural network can read it or deal with it.
Thirdly, we define input and a hidden layer with 512 neurons and an activation function which is the relu function
And the last thing, we create the output layer with 10 neurons and a softmax activation function that will transform the score returned by the model to a value so it will be interpreted by humans.
Compile the Model
Since we finished building the neural network we need to compile the model by adding some few parameters that will tell the neural network how to start the training process.
First we add the optimizer which will create or in other word update the parameter of the neural network to fit our data.If you want to train the data within less time and more efficiently then adam is the best to choose.
Second, the loss function that will tell you the performance of your model.
Third, the metrics which give indicative tests of the quality of the model.
Train the Model
We can call the fit sub package and feed it with the training data and the labelled data that correspond to the training dataset and how many epoch should run or how many times should make a guess
and callback is we saw earlier.It is nothing but it can stop the metrics whenever it can find efficient loss.
Make Predictions:
For instance, we are trying to predict the number that corresponds to the image number 12 in the test dataset
As you see the prediction output is 9, but how we can make sure that this prediction was true? Well, in this case we need to plot the image number 12 in the test dataset using matplotlib.
Thanks for reading and "HAPPY CODING💜"


.png)


Comments
Post a Comment